BornomalaScript Installation Guide
A complete installation guide for BornomalaScript on Windows and Linux with verification, troubleshooting, and VS Code setup.
Installation
BornomalaScript is a Bangla-first programming language designed to make learning and building software more accessible for Bangla speakers. This guide explains how to install the compiler, configure your system path, verify the command line tools, and solve the most common setup issues.
Use only official downloads from the project website or official release pages. If you are helping students or beginners, this guide is written so they can follow it from start to finish without needing prior compiler experience.
Why this installation matters
Before you write your first program, the compiler must be installed correctly on your computer. A clean installation gives you three important things:
- The
bscommand works from any terminal window - Your editor can recognize
.bsfiles and language features - You can check compiler updates and metadata quickly when needed
If any part of the setup is incomplete, the compiler may still be present on disk but unavailable from the command line. That is why this guide includes verification steps after every major section.
What You Need Before Installing
Before you begin, make sure you have the following:
- A 64-bit Windows PC or a Debian-based Linux system
- Permission to install software on the device
- Access to a terminal or Command Prompt
- A stable internet connection for downloading the installer or package
- The official BornomalaScript release file for your operating system
- A few minutes to complete the setup carefully
If you are installing on a shared computer, make sure you know whether you can edit environment variables or use sudo. Those permissions matter during installation.
macOS:
macOS support is coming soon.
Recommendation:
After installation, verify the compiler immediately with bs --version so you can catch PATH or package issues early.
Windows Installation
Windows users normally install BornomalaScript through a setup file. After installation, the main task is to add the compiler folder to PATH so the bs command works everywhere.
Windows is a good choice for first-time users because the installer handles the program files automatically. The main responsibility for the user is to confirm the install location and register it in PATH.
Windows Installation Overview
The Windows installation has five parts:
- Download the installer from the official release page
- Run the setup file and complete the installation wizard
- Locate the install folder on your system
- Add that folder to the system PATH variable
- Confirm that
bs --versionworks in a fresh terminal
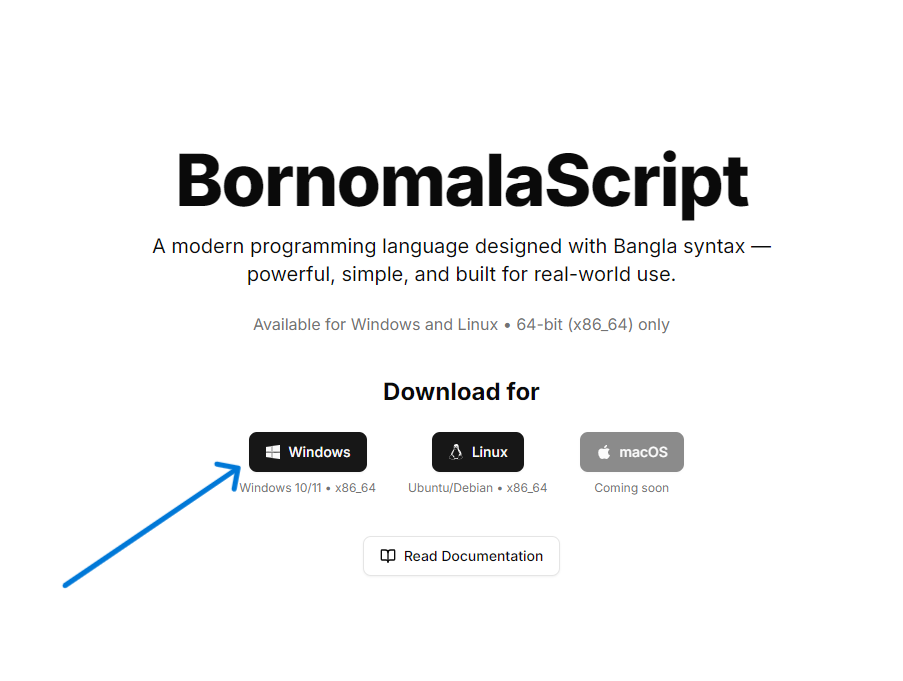
Step 1: Download the installer
Download the latest Windows release from the official BornomalaScript website.
Make sure the file matches your system architecture and that you are using the official release page, not a third-party mirror.
If you are distributing this guide in a classroom or lab, tell students to download the same official package so all machines use the same compiler version.
Photo instructions:
Step 2: Run the setup file
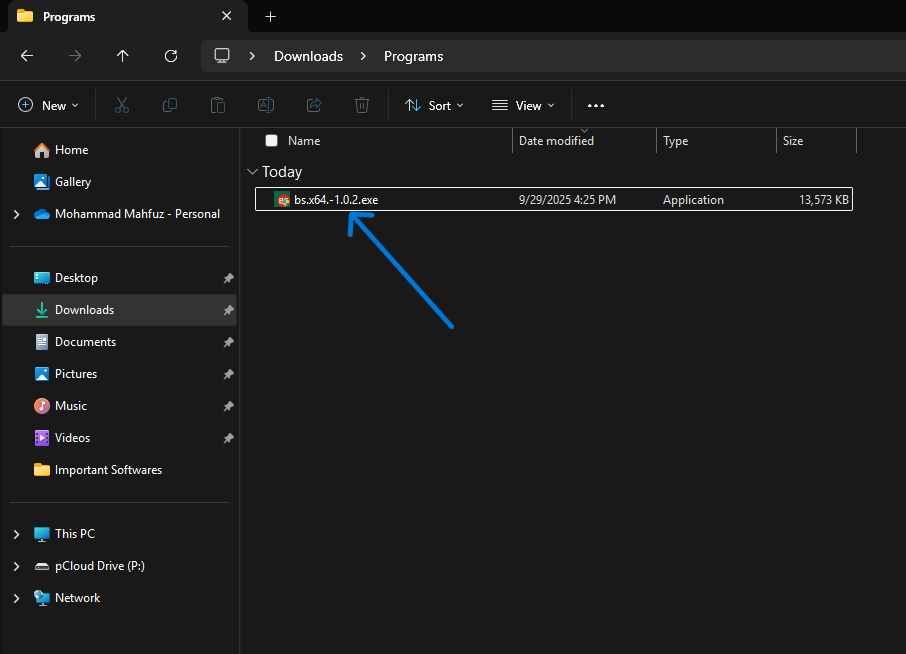
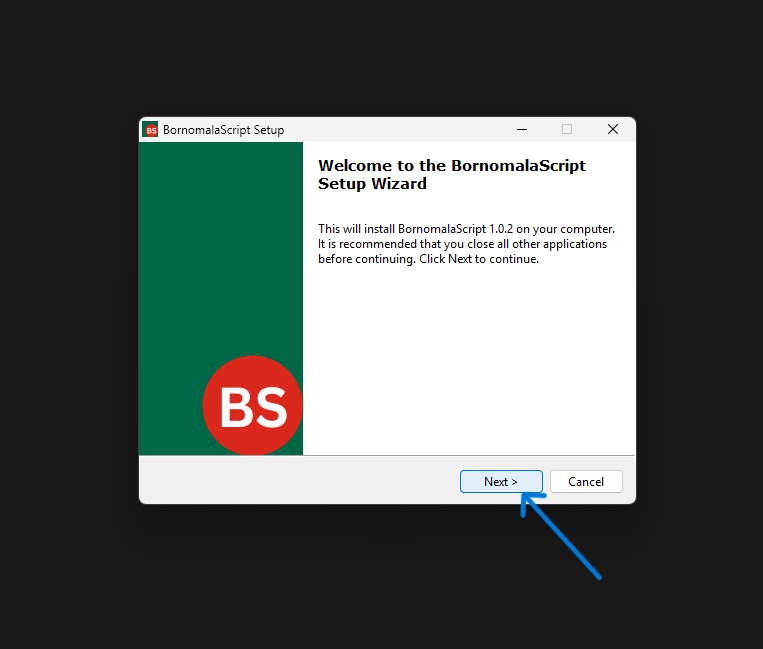
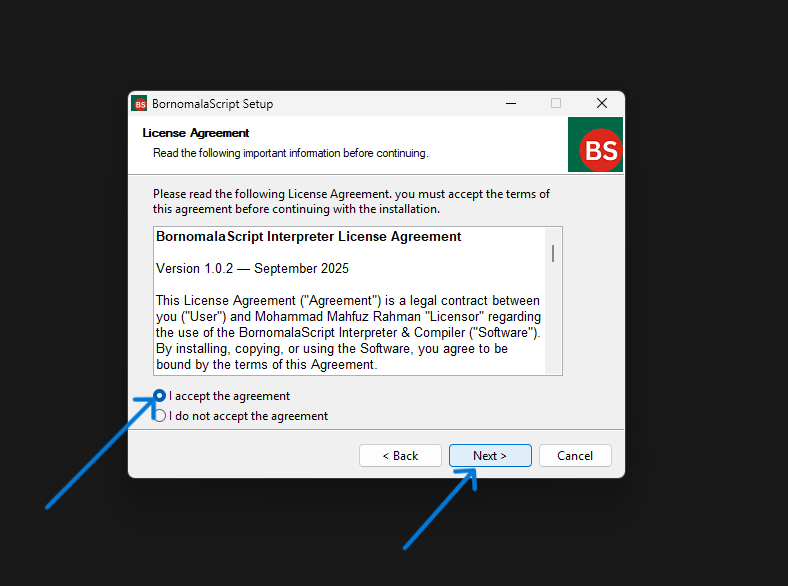
Open the downloaded installer and follow the on-screen instructions. If Windows asks for confirmation, make sure the file came from the official source before continuing.
When the setup wizard appears, read each screen before clicking next. Many installation problems happen when users accept the default steps without checking what the installer is changing.
If the installer offers a custom location, the default folder is usually the safest choice unless your organization requires a different path.
Photo instructions:
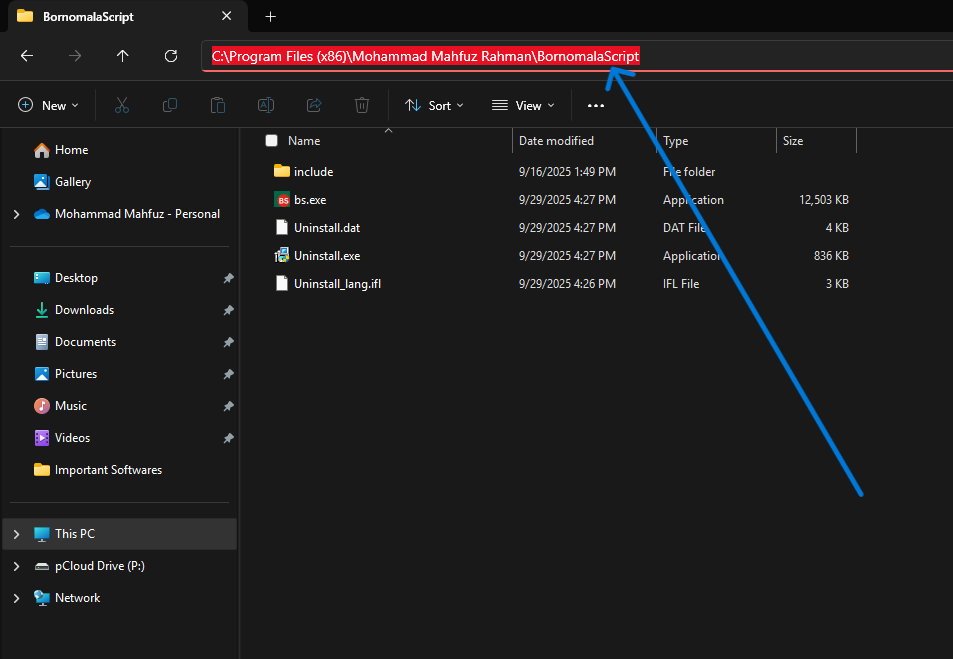
Step 3: Find the install folder
After installation, open the default install location and copy the path.
The compiler files are typically installed in a fixed application directory. Copying the exact folder path matters because PATH must point to the folder that contains the executable.
Example path:
C:\Program Files (x86)\Mohammad Mahfuz Rahman\BornomalaScript
Photo instructions:
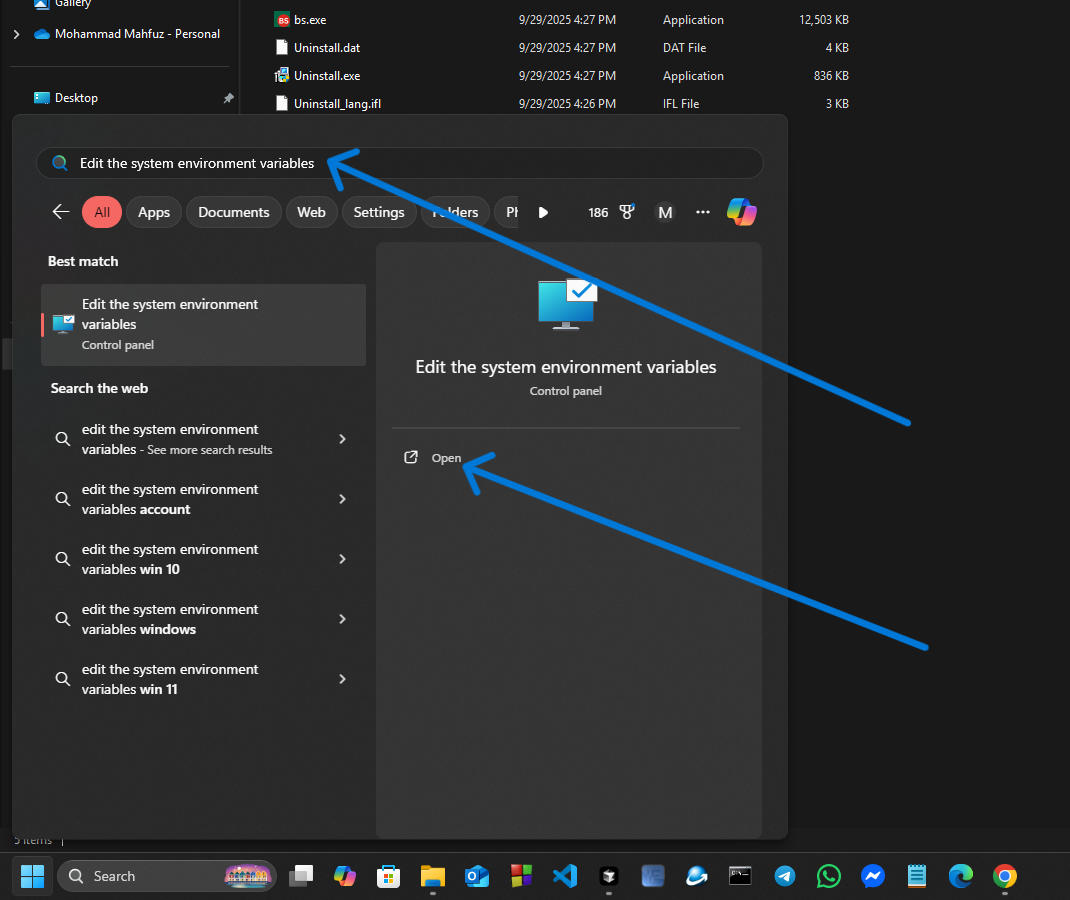
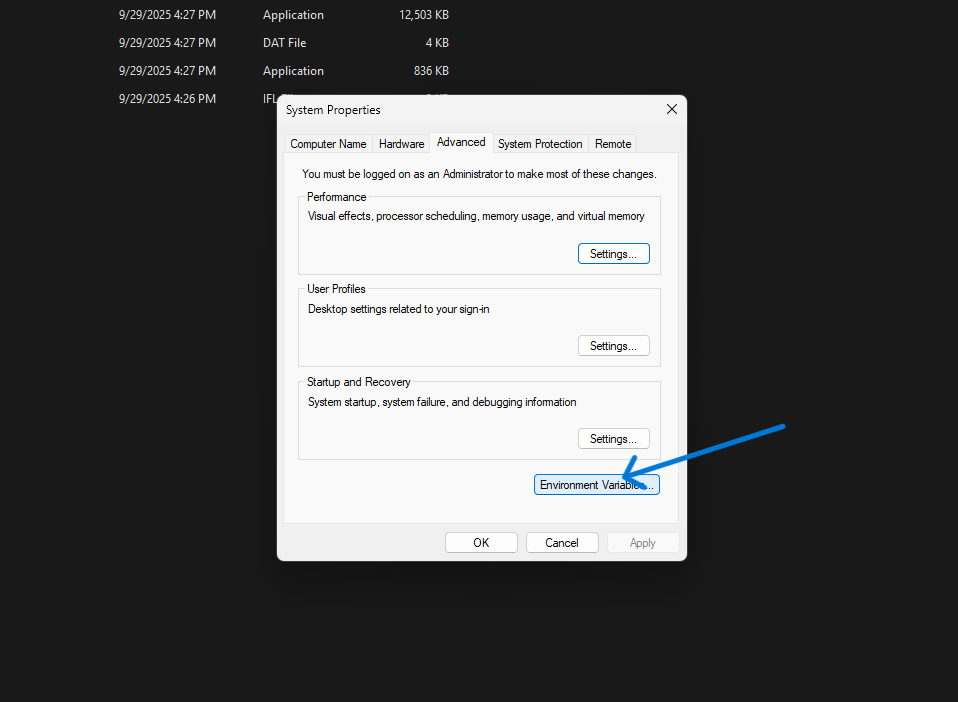
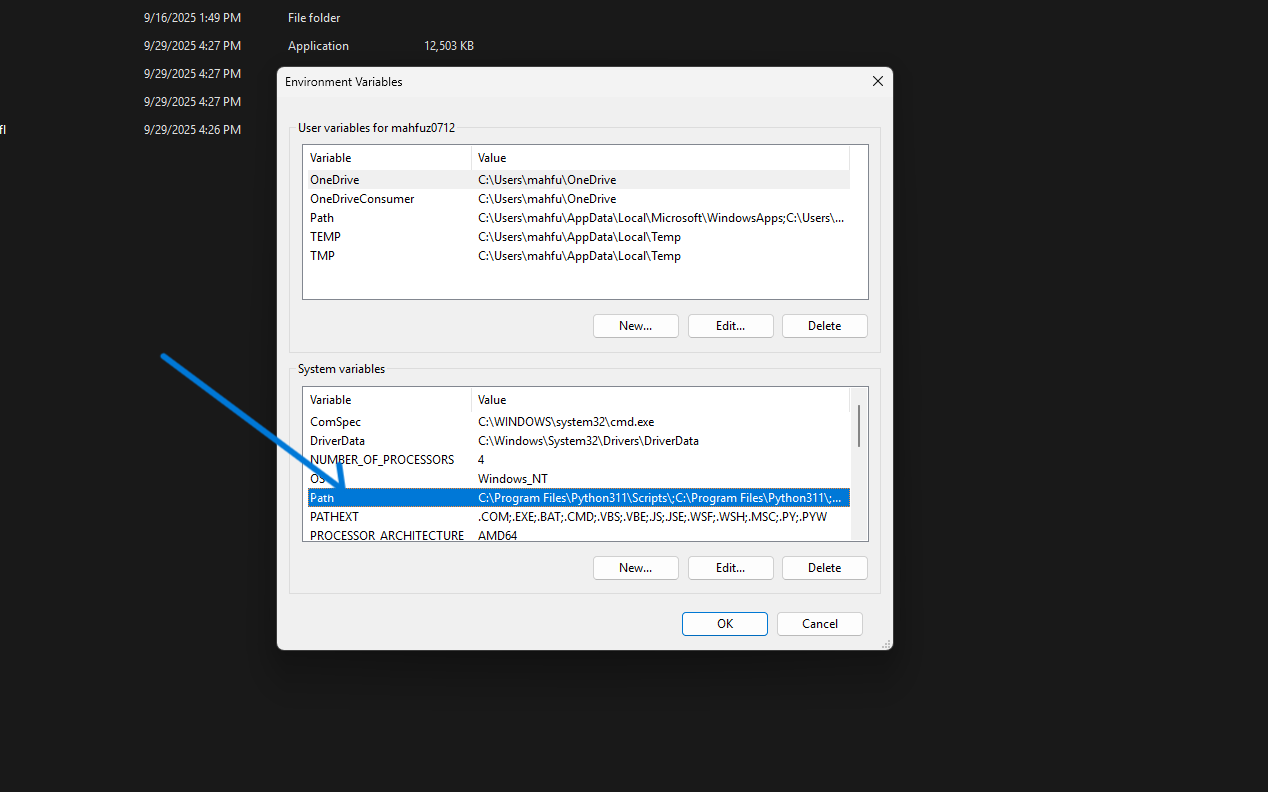
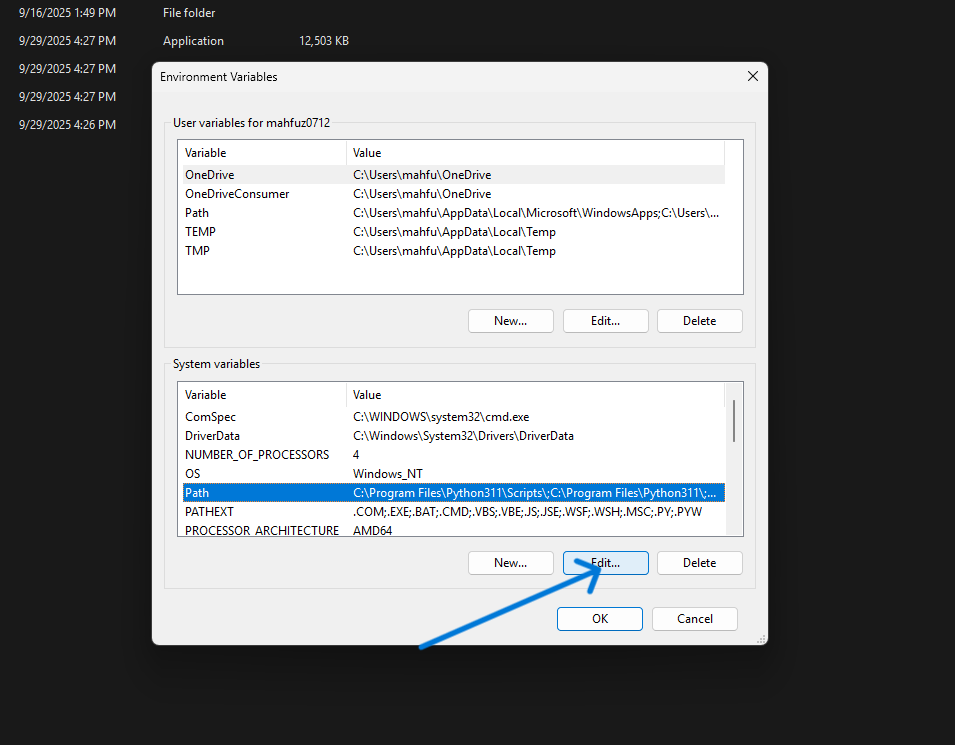
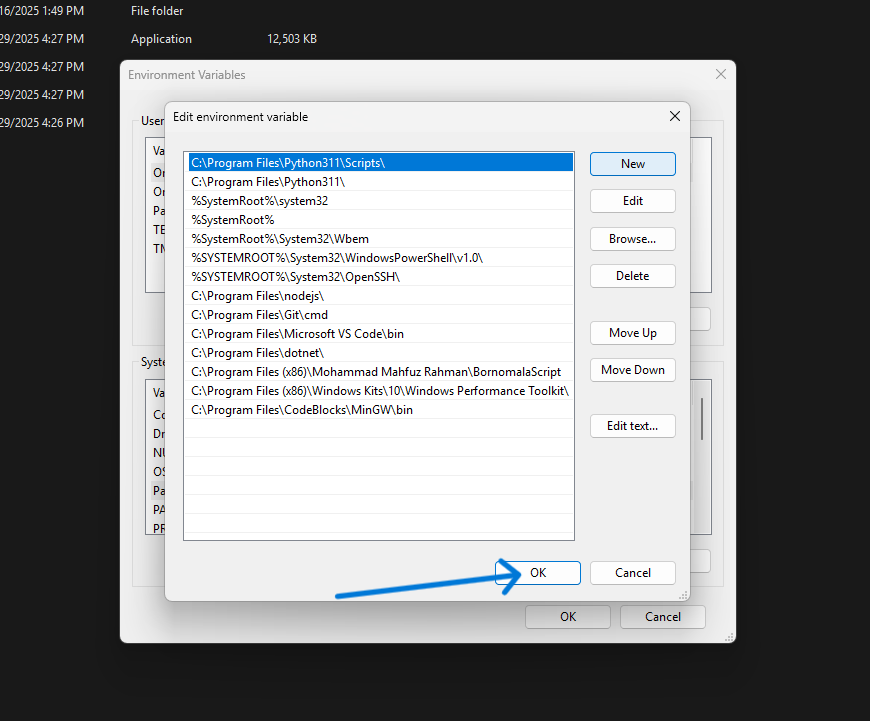
Step 4: Add the folder to PATH
Open Environment Variables and add the install path to the system Path variable. This lets you run bs from any folder.
Adding the folder to PATH is the step that makes the installation useful in day-to-day work. Without it, you would need to open the install directory every time you want to use the compiler.
If you are not sure whether the path was added correctly, close and reopen Command Prompt before testing.
Photo instructions:
Step 5: Verify the installation
Open a new Command Prompt window and run:
bs --version
If the installation is correct, the compiler version will appear on screen.
This is the most important check on Windows because it proves the terminal can find the compiler without a full file path.
Useful Windows commands
After the version check works, try these commands:
bs --metadata
bs --help
bs --metadata is useful for checking package information, while bs --help shows the available command line options.
Common Windows mistakes
The most common mistakes on Windows are simple but easy to miss:
- Adding the wrong folder to PATH instead of the folder that contains the executable
- Forgetting to open a new terminal after editing environment variables
- Using an old installer from an unofficial source
- Running the command in a terminal that was opened before PATH was updated
If bs is not recognized, one of those four problems is usually the cause.
Linux Installation
Linux users on Debian or Ubuntu can install BornomalaScript from the downloaded .deb package.
Linux installation is often straightforward because the package manager handles much of the file placement for you. The main goal is to install the package cleanly and confirm the command is available afterward.
Linux Installation Overview
The Linux installation has four parts:
- Download the
.debpackage from the official release page - Open a terminal in the folder where the file was saved
- Install the package with
dpkg - Verify the installation with
bs --version
Step 1: Download the package
Download the latest .deb file from the official release page.
Choose the correct file for your system architecture. If you are unsure, check whether your device is 64-bit before downloading.
Step 2: Open a terminal in the download folder
Move to the folder where the file was saved.
Keeping the package in a simple folder path makes the command line easier to use and reduces the chance of typing errors.
Step 3: Install the package
Run:
sudo dpkg -i path/to/file.deb
If the system reports dependency problems, resolve them using your package manager and then try again.
You may be asked for your password because sudo needs administrator permission. That is normal during package installation.
If the install command fails because of missing dependencies, do not skip the error. Fix the dependency issue first and then rerun the package install.
Step 4: Verify the installation
Run:
bs --version
If the command prints a version number, the compiler is installed correctly and available in your shell.
Useful Linux commands
bs --metadata
bs --help
These commands are useful after installation because they confirm the tool is installed completely, not just partially.
Common Linux mistakes
The most common Linux setup problems are:
- Downloading the wrong package file for your architecture
- Running
dpkgfrom the wrong folder without using the correct file path - Forgetting to resolve dependency errors after installation
- Testing
bsin a shell session that needs to be reopened
If bs --version fails, check those items before assuming the installation did not work.
VS Code Setup
After installing the compiler, you can use the Bornomala Script Pack extension in Visual Studio Code.
- Install the official Bornomala Script Pack extension
- Open or create a
.bsfile - Restart VS Code if language features do not load immediately
VS Code support is useful because it turns the compiler into a more comfortable learning environment. Students can edit .bs files, spot syntax better, and move between lessons and coding faster.
If the extension does not activate right away, restart VS Code after installing it and open a real .bs file instead of an empty tab.
Why VS Code helps
Editor support is useful because it improves the learning experience:
- Syntax highlighting makes code easier to read
- Extension support helps with editing speed and consistency
- A familiar editor lowers the barrier for beginners
- Students can move between lessons and code faster
Learning tips after installation
Once the compiler is ready, spend a few minutes checking the basics of your environment:
- Run
bs --helpto understand available commands - Run
bs --metadatato confirm the installed version - Open a sample
.bsfile in VS Code and test syntax highlighting - Keep the install folder handy in case you need to troubleshoot PATH again
These small checks save time later when you begin writing and debugging code.
Troubleshooting
If the compiler does not run, check the following first:
- Confirm that the install path was added to PATH on Windows
- Open a new terminal after changing environment variables
- Confirm that the Linux package installed without dependency errors
- Make sure the download matches your operating system
If you still see an error after checking those items, uninstall the broken install, download the official release again, and repeat the steps carefully.
For classroom or team environments, it helps to write down the exact version that was installed on each machine so everyone uses the same release.
Common Windows mistakes
- Adding the wrong folder to PATH instead of the folder that contains the executable
- Forgetting to open a new terminal after editing environment variables
- Using an old installer from an unofficial source
- Running the command in a terminal that was opened before PATH was updated
Common Linux mistakes
- Downloading the wrong package file for your architecture
- Running
dpkgfrom the wrong folder without using the correct file path - Forgetting to resolve dependency errors after installation
- Testing
bsin a shell session that needs to be reopened
Frequently Asked Questions
Is macOS supported?
Not yet. macOS support is planned for a future release.
That means the current releases are focused on Windows and Debian-based Linux systems only.
How do I know installation worked?
Run bs --version. If the command prints a version number, the compiler is installed correctly.
You can also test bs --help to confirm the command responds normally.
Where should I download BornomalaScript from?
Only from the official BornomalaScript website or official project release pages.
This reduces the risk of downloading an outdated or modified installer.
What if I still see command not found?
The most common cause is a missing PATH entry or an old terminal session. Open a new terminal and try again.
If that does not fix it, recheck the exact folder you copied into PATH and confirm that it contains the compiler executable.
Why is the guide so detailed?
Because installation problems are easier to prevent than to fix later. A detailed guide helps beginners, students, and teachers get to the same working result on the first try.
Should I keep the downloaded installer after setup?
It is a good idea to keep the installer or .deb package until you have confirmed the compiler works and your PATH settings are correct. After that, you can archive it for later use if needed.
Need Help?
If you still cannot install BornomalaScript, review the main documentation pages, then contact the project maintainer through the official project links from the homepage.
Quick Checklist
Before you move on to coding, confirm these points:
- The installer or package was downloaded from the official source
- The compiler runs with
bs --version - The help output works with
bs --help - The metadata output works with
bs --metadata - VS Code recognizes
.bsfiles if you installed the extension
Summary
Once installation is complete, you should be able to run bs --version, bs --help, and bs --metadata from the command line. That confirms your environment is ready for BornomalaScript development.
If you are preparing this page for Google AdSense review, the goal is not just word count. The page should feel complete, useful, and trustworthy, with real steps, real checks, and no placeholder content.